Inside any storage water heater there is a metal rod - an anode made of magnesium-aluminum alloy. The element serves as a tank protection and is gradually corroded by corrosion during operation. It is important not to miss the moment of final destruction - to timely replace the magnesium anode, and at the same time to clean the tank and the tubular electric heater (in short - TEN) from scale. We do not invite plumbing masters, we carry out work independently and completely free of charge.
Briefly - why do you need a magnesium rod
Boiler parts are made of dissimilar metals:
- tank - stainless steel or “black” with enamel coating;
- TEN tube with a nichrome spiral inside - copper.

When water is heated, these metals are exposed to electrochemical corrosion that occurs due to the fault of dissolved oxygen and salts. First of all, the heater is destroyed, then the walls of the tank.
Buying and replacing a defective electric heater is relatively simple. Another thing is a leaky tank that cannot be repaired or changed; the boiler goes to the scrap entirely.
To extend the life of metal parts, a sacrificial anode made of a more active metal, magnesium (less commonly titanium), is included in the household storage. The principle of cathodic protection is used - corrosion first “eats” the rod, and then it is taken as a heater and the walls of the tank. That is why it is important to seize the moment and put a new anode in place of the destroyed one.

Note. In DHW tanks of indirect heating, where copper heat exchangers in the form of coils are installed, a magnesium anode of the appropriate size is also used. The designs of electrical apparatuses and "indirect" are described in detail in separate articles.
Change the protective anode of the electric boiler
In suspended vertical boilers of this type, the cathodic protection rod is installed on a common platform with a heating element attached to the bottom of a steel vessel. In horizontal models of water heaters, the heater block is attached to the tank wall, facing down.
Reference. The Termex brand manufactures universal Optima devices that are equally suited for vertical and horizontal mounting. There, a flange with a heater and anode is mounted in the end of the tank. Gorenje universal boilers are made differently: the heater stands in one end, the rod in the other (see diagram).

To replace the anode element of the boiler with your own hands, prepare such a tool:
- a set of keys for nuts with a size of 8 ... 19 mm;
- magnetic screwdriver for crosswise slot;
- pliers;
- flashlight - highlight from below and inside the tank;
- emery paper (to clean TEN);
- hose for emptying the water heater;
- rags;
- wide plastic basin.
Surely from the whole set you will need only 1 key, but its size will become known after dismantling the cover. The basin is necessary for cleaning - you don’t want to scrape dirt directly onto the floor or into the bathroom (if the boiler hangs above it).
Preparatory stage
What you need to do before disassembling the device:
- Disconnect the water heater in any way possible - turn off the "machine", pull out the plug from the outlet.
- Shut off the cold water supply to the inlet of the drive.
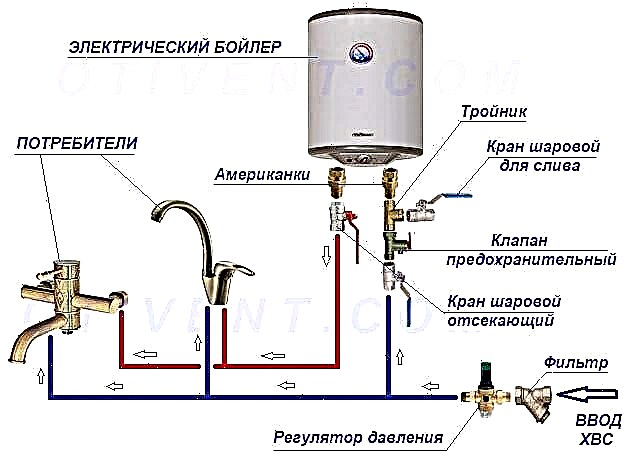
- If the boiler is tied according to the above diagram, open the “hot” valve on the nearest mixer. About a liter of water will flow from there, then open the drain cock and empty the tank into a bucket or directly into the bathtub.

If the valve is clogged and there are no taps at the boiler inlet, you will have to use the radical method - unscrew the flexible connections from the fittings of the device with a gas wrench. To drain water in portions, for example, using a bucket, periodically close the “cold” nozzle with your hand - the jet will be interrupted under the influence of vacuum. Just remember to cool the drive to a comfortable temperature.
Dismantling and cleaning the tank
Now we will consider how to remove the TEN block from the water heater and replace the protective anode:
- Turn out screws of fastening of a cover by a magnetic screwdriver, remove it and move aside.
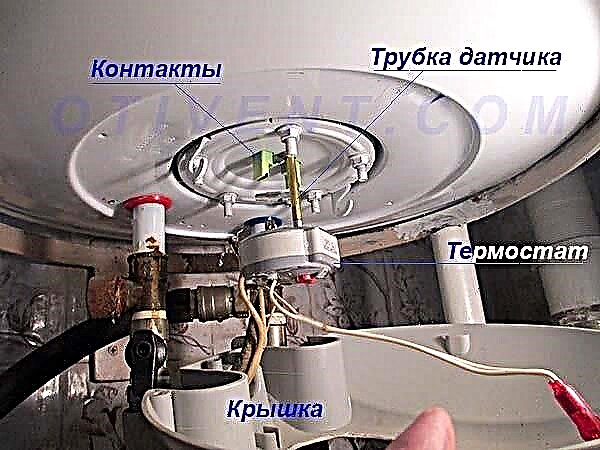
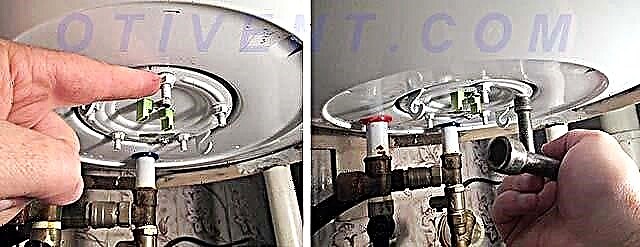
- If there is enough free length of wires, immediately pull the thermostat and sensor out of the tube (held on the contacts). Otherwise, disconnect the power cable, then remove the thermocouple.
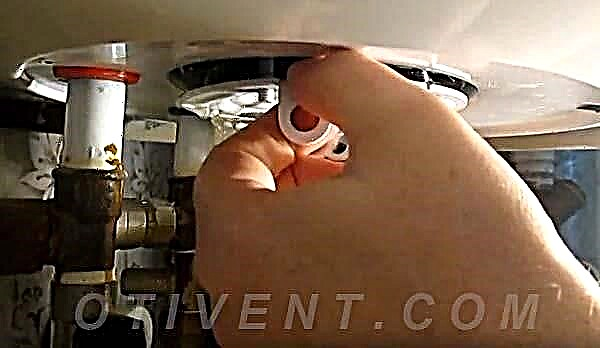
- Using a wrench, unscrew the block flange. The size and number of bolts depends on the modification of the boiler. For example, on "Aristons" there is a fastening on 5 nuts 10 mm turn-key or a spacer bar on one 14 mm nut.
- Place a basin and carefully remove the block. Make a small effort first - the rubber seal must have stuck to the landing pad. Up to 0.5 l of water remains in the tank, which immediately spills out along with the dirt that has accumulated at the bottom.
- Use a pair of pliers to grab the old anode (or the thin rod that remains of it) and unscrew the part from the socket.
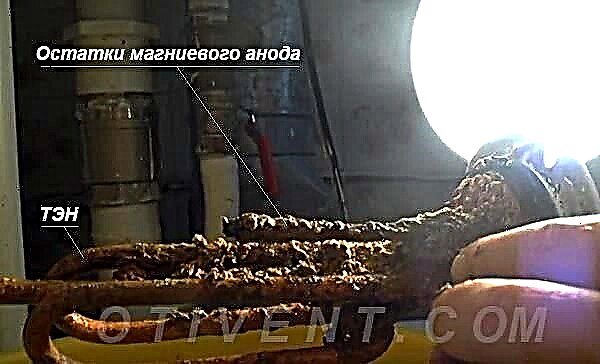
- After extraction, proceed to cleaning the heating element mechanically - remove the scale with a screwdriver and clean it with sandpaper.


Tip. In order not to mix up the wires during the assembly process, draw a diagram before disconnecting, or better, take a picture with your smartphone’s camera.
At the end of the disassembly, it is worth taking a moment and thoroughly washing the tank from the inside with kitchen tools. For rinsing, briefly open the cold water supply - the jet will wash away the dirt from the walls and drain into the basin.

It remains to screw a new anode for the boiler into the socket of the cleaned block, tighten the rod with the force of the hand and assemble the device in the reverse sequence. Before switching on, be sure to fill the tank - open the water supply and wait until the water runs out of the mixer (remember, did we open the “hot” valve earlier?).
The procedure for installing the anode differs little on models of different brands. The algorithm is the same everywhere - you need to empty the vessel, disconnect the boiler from the mains and remove the heater block. An exception - devices with a separate location of the rod, which we will consider further.
We serve indirect heating capacity
We note right away - the replacement operation here is much simpler than in electric boilers. Since the anode in the indirect water heater is at the top and is not connected in any way with other elements - a heat exchanger or an additional heating element in combined models.

How to change the anode in a floor indirect heater:
- Shut off cold water.
- There is no need to empty the tank, you just need to relieve the pressure. Open the “hot” valve on the mixer and drain 2-3 liters of water through the drainage tap of the device, then cut off the DHW line.
- Using a spanner or cap wrench, unscrew the plug on the lid of the container and pull it out together with the old anode.
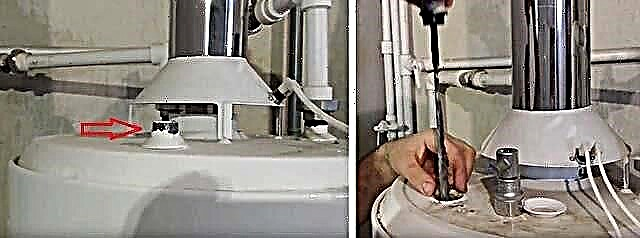
- Unscrew the rod with pliers, wrap a new one in its place and tighten by hand.
- Insert the element into the tank and tighten the plug with a little effort, so as not to transfer the rubber seal ring. It is advisable to check the latter after disassembly, if necessary, replace it.

Tip. Before disassembling, it is worth cutting the circulation pump of the boiler so that the coolant does not drive through the coil.
Similarly, the core changes on stationary water heaters equipped with a gas burner. The order of work is shown in the video:
If it is necessary to maintain the wall version of the “indirect man”, the water will have to be drained. The protective rod is removed using the technology described in the previous section about electrical models.
When to change the anode
The service life of an element depends on 2 factors - the operating mode and water hardness. The intensity of the boiler does not need to be interpreted - the greater the consumption in the domestic hot water system, the higher the load on the heater parts.
Water hardness is determined by the content of calcium and magnesium salts. The higher their concentration, the sooner the reaction of electrochemical corrosion proceeds, the metal of the anode decomposes faster. In soft water, the process slows down significantly, in distilled water it is reduced to zero.

How often it is necessary to change the magnesium anode depending on the operating conditions of the hot water storage device:
- With continuous operation + hard water - annually.
- Ordinary tap water, the heater operates continuously - 1 time in 2 years, at least.
- With less load, it is worth cleaning the boiler 1 time for 2 years and monitor the condition of the element.
- An exception to the rule is a titanium rod working in conjunction with an external power source, the so-called active cathodic protection. The system is designed for a long service life.
An important point. In some models of storage heaters, the anode is separate from the heater and fixed in such a way that without a special tool it can not be reached (for example, Gorenje GBFU 80N). The way out: remove the heater block in the traditional way and attach a new element from below to the flange.
Conclusion
If you are operating a DHW cylinder, you should pre-purchase a new rod and keep it in stock. In electric boilers, the magnesium anode is mounted on different threads - M5, M6, M8. Before buying, find out exactly the diameter of the connection element in your device.