The floor heating system is the most comfortable and economical option for heating a private house. The reverse side of the coin is the decent price of components and installation compared to the cost of the radiator circuit. We offer to save significantly - to buy materials, install a water-heated underfloor floor with your own hands and pour cement screed. To help, we provide step-by-step instructions on the installation of heating circuits with the lowest financial costs.
The theme of underfloor heating is quite extensive, to cover all the nuances in a single publication is simply unrealistic. From time to time, we will direct you to other articles detailing complex issues. Here we will focus on the installation of underfloor heating (abbreviated as TP) in a “wet” way, which involves pouring a concrete monolith. How to make a “dry” version of TP on a wooden floor, read in the appropriate section.
Work stages
The device of the heated floor in an apartment or a private house is a set of measures that are carried out in strict order:
- Design - calculation of the necessary heat transfer, laying pitch and pipe length, breakdown into contours. Depending on the type of base (floor), the composition of the “cake” of the warm floor is selected.
- The choice of components and building materials - insulation, pipes, manifold with a mixing unit and other auxiliary elements.
- Foundation preparation.
- Installation works - layout of insulation and pipelines, installation and connection of a distribution comb.
- Filling the system with coolant, hydraulic tests - pressure testing.
- Pouring a monolithic screed on a cement-sand mortar, initial start-up and heating.
Recommendation. Perform the installation of the TP during the construction process of the building, immediately after the construction of partitions between the rooms. This will allow you to provide the desired threshold height and freely fit the "pie" under the floor covering. If doorways with low thresholds are already formed in the living quarters, try to get out of the situation using the suggested methods.
We turn to a detailed consideration of each stage of the arrangement of heating floors.
Calculation and development of floor heating schemes
To properly install a warm floor under the screed with your own hands, consider a number of important points and requirements:
- the maximum temperature of the finish coating is 26 degrees, a hotter surface often causes residents discomfort and a feeling of stuffiness;
- accordingly, the water in the floor pipes is heated to a maximum of 55 ° C, so you can’t connect directly to the central heating of the apartment;
- under stationary furniture, for example, a kitchen set, floor heating is not done;
- the length of the pipe of one circuit does not exceed 100 meters (optimally - 80 m), otherwise you will get an uneven distribution of heat, excessive cooling of the water and the cost of a more powerful circulation pump;
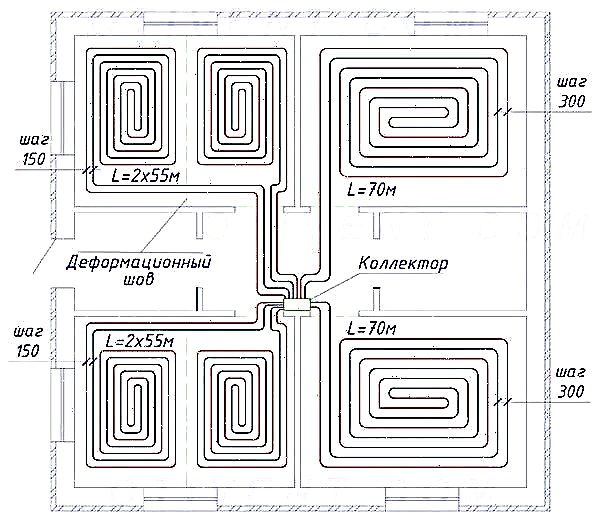
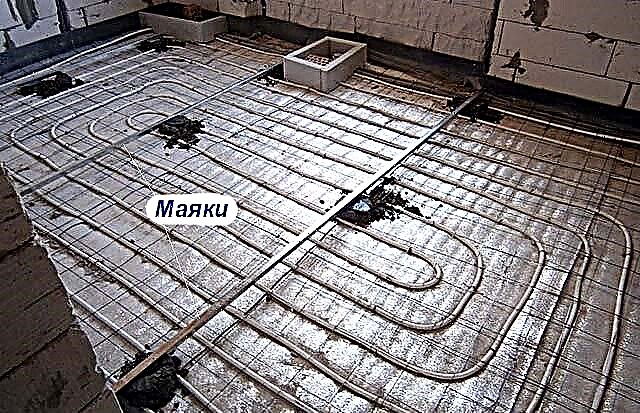
- to comply with the previous rule, rooms of large area are divided into 2-3 heating plates, between which a deformation seam is arranged, as shown in the figure.

First, we propose a more correct, albeit complex, design option. After reading our instructions, calculate the heating capacity in any of 3 ways - by volume, area or heat loss of the room. Then determine the laying pattern, diameter and distance between adjacent pipes, taking into account the thermal resistance of the coating - laminate, linoleum or tile.
Note. The methodology for calculating the step of laying pipes under the tile and other types of coatings is explained in the next guide.
We outline a simplified version of the development scheme, practiced by many builders:
- If you live in regions with a cold climate, lay the pipe with an interval of 10 cm. For the middle strip and the south, the step is taken equal to 15 cm, in the bathroom under the tile, 200 mm is enough.
- We consider the length of the pipeline to 1 room. At a distance between the threads of 100 mm per square meter, 10 m of pipes will fall, at a step of 15 cm - 6.5 m. If the total length exceeds 100 m, we divide the area into 2 equal parts - two separate heating monoliths.
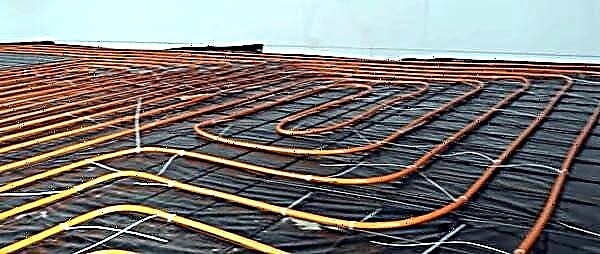
- Among the existing laying schemes - “snail” and “snake” - it is better for a beginner to choose the latter - it is easier to mount.

- We determine the number of heating circuits and select a collector with an appropriate number of leads. A cheaper option is to make a comb yourself.
- We place the collector in a convenient place in the home (for example, a corridor). It is recommended to maintain the same distance to all rooms, for an example, see the drawing of a one-story house.
- The pipes in the corridor will probably fall too close - they must be insulated with a plastic sleeve.
- Be sure to provide a two-pipe wiring in the floor from the boiler to the heating radiators.


Let us explain why to mount the wiring for batteries. Having laid pipe loops without calculation, you do not know in advance whether the TP capacity is enough on the coldest winter days. If a problem arises, it is not worth heating the warm floors above 55 ° C; it is more correct to turn on the high-temperature radiator network.
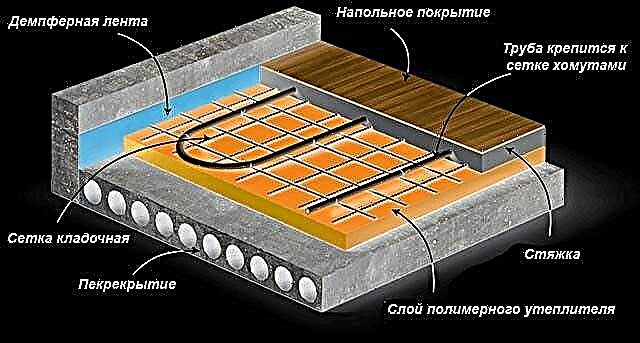
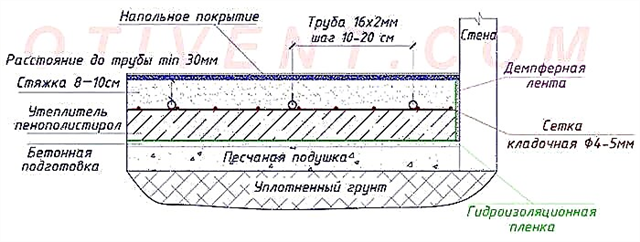
The composition of the "pie" of warm floors on the ground
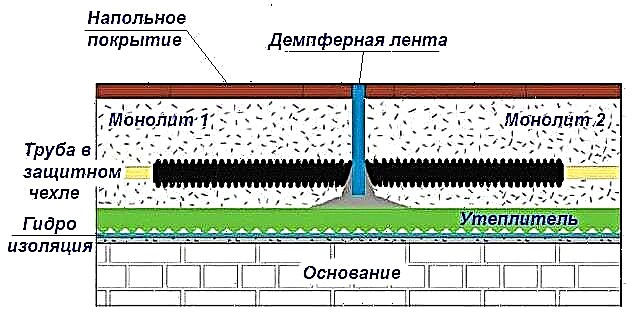
Many schemes have been published on the Internet that vary in composition. The confusion is usually caused by the use of film vapor - and waterproofing between the various layers of the "cake". Let’s explain each element of the classical scheme of a warm water floor arranged on the ground (layers are listed from bottom to top):
- The base is carefully compacted soil.
- A pillow is sand or a sand-gravel mixture 10–20 cm thick (if necessary) in a compacted state.
- Concrete preparation with a height of 4-5 cm allows you to level the base and avoid further subsidence during the installation of the TP.
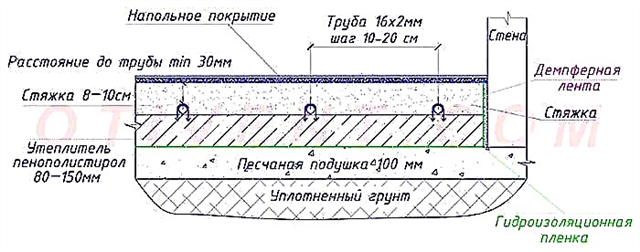
- The waterproofing substrate protects the "pie" from the capillary rise of water from the ground. It is this phenomenon that makes damp foundations not protected by bitumen insulation damp.
- The task of the insulation is to reflect the generated heat flow upward so as not to heat the ground.
- Pipelines with hot water are a source of heat.
- Sand-cement screed - an element of surface heating plus a solid base for the finish coating.
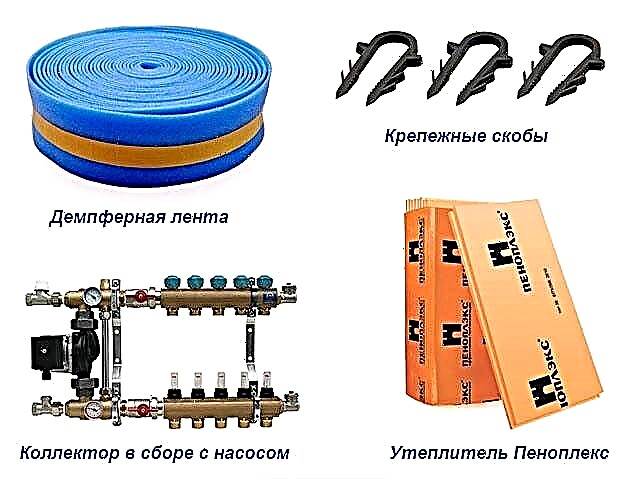
- Side damper tape - a buffer that compensates for the thermal expansion of the concrete slab. When heated, the screed compresses the polyethylene gasket and does not crack. A similar elastic damper is laid in expansion joints between adjacent monoliths.

An important point. The described scheme is correct when using polymer insulators that do not allow moisture - extruded polystyrene foam, polystyrene foam and polyurethane foam. If fire safety rules require laying basalt wool, an additional layer of film must be laid under the screed to protect the heater from getting wet from above.
Masters often simplify the construction of underfloor heating - they put insulation directly on the sand cushion, without filling the rough concrete. The solution is acceptable under one condition - the sand must be carefully leveled and compacted in a mechanized way - a vibrating plate.
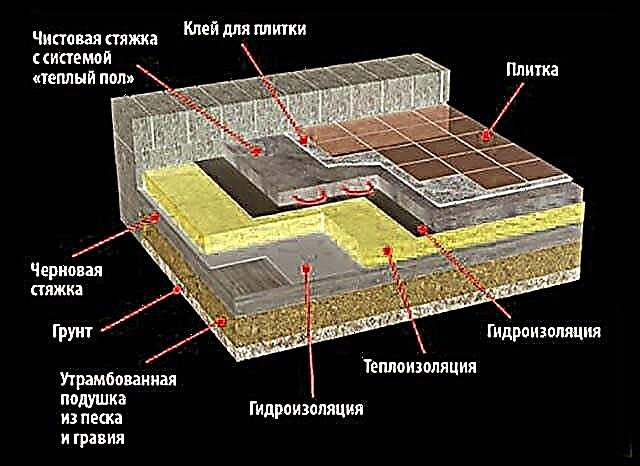
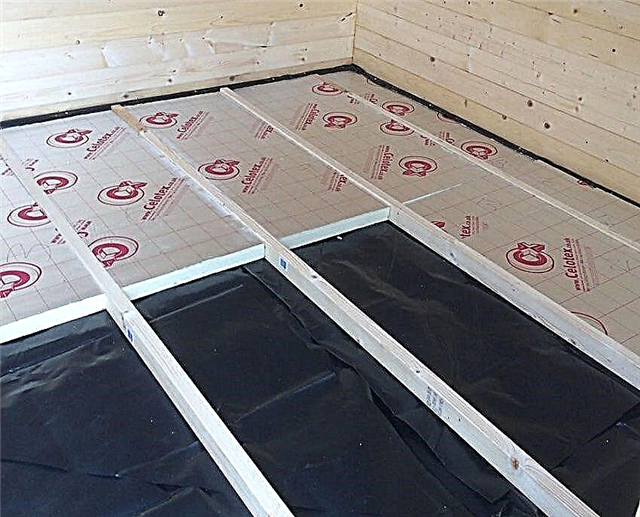
When installing a wooden floor on the logs, it is better to refuse the screed. Use the “dry” method of TP device - tapping from boards or chipboard and metal scattering plates. Thermal insulation material - mineral wool.
TP scheme on concrete floor
It is advisable to use this method of floor heating in rooms above cold basements or on insulated balconies (loggias). It is unacceptable to do water TP over the living rooms of apartment buildings, although some owners ignore the ban.
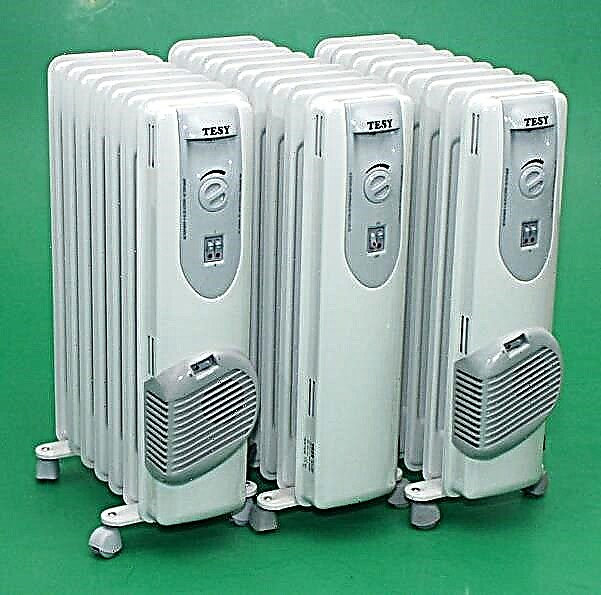
Tip.In multi-storey buildings or in summer cottages with periodic heating, it is easier and cheaper to put electric underfloor heating - cable or infrared from a heating carbon film.
TP “pie”, arranged over a cold room, is done similarly to heating on the ground, but without a sand cushion and rough screed. If the surface is too uneven, the insulation boards are laid on a dry mixture of cement and sand (1: 8 ratio) 1–5 cm high. The heating circuits above the heated rooms can be laid without waterproofing.
Material Guidelines
Here is a list of equipment and building materials that will be used for the installation of a water heated floor:
- a pipe with a diameter of 16 mm (inner passage - DN10) of the estimated length;
- polymer insulation - polystyrene with a density of 35 kg / m³ or extruded polystyrene foam 30–40 kg / m³;
- Damper tape made of polyethylene foam, you can take "Penofol" without foil 5 mm thick;
- polyurethane mounting foam;
- 200 micron film, adhesive tape;
- plastic staples or clamps + masonry mesh at the rate of 3 fastening points per 1 meter of pipe (interval 40 ... 50 cm);
- thermal insulation and protective covers for pipes crossing the expansion joints;
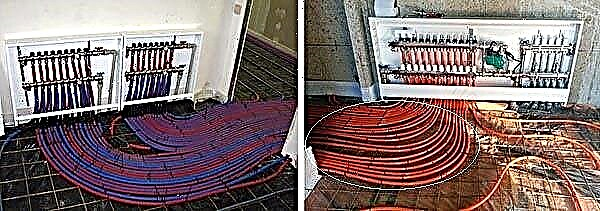
- a collector with the required number of terminals plus a circulation pump and a mixing valve;
- ready-mixed mortar for screed, plasticizer, sand, gravel.

Why it is not necessary to take mineral wool for thermal insulation of floors. Firstly, expensive high-density boards of 135 kg / m³ will be needed, and secondly, porous basalt fiber will have to be protected from above with an additional layer of film. And the last thing: it’s inconvenient to attach pipelines to the wool - you will have to put a metal mesh.
Explanation on the use of masonry welded wire mesh Ø4-5 mm. Remember: building material does not reinforce the screed, but acts as a substrate for reliable fastening of pipes with plastic clamps when the “harpoons” do not hold well in the insulation.
The thickness of the thermal insulation is taken depending on the location of the heated floors and the climate in the place of residence:
- Ceilings over heated rooms - 30 ... 50 mm.
- On the ground or above the basement, the southern regions - 50 ... 80 mm.
- The same, in the middle lane - 10 cm, in the north - 15 ... 20 cm.
Note. If you want to accurately calculate the thickness of the insulation according to the SNiP method and find out the thermal characteristics of various insulation materials, go to the instructions for covering ceilings.
In warm floors, 3 types of pipes with a diameter of 16 and 20 mm are used (DN10, DN15):
- from metal plastic;
- cross-linked polyethylene;
- metal - copper or corrugated stainless steel.
Polypropylene pipelines cannot be used in TP. Thick-walled polymer does not transfer heat well and significantly lengthens from heating. Soldered joints, which will necessarily be inside the monolith, will not withstand the stresses that arise, are deformed and will leak.
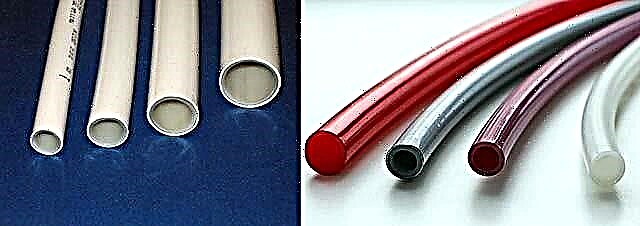
For beginners, we recommend using plastic pipes for self-heating floor heating. Causes:
- The material easily bends with the help of a limiting spring; after bending, the pipe “remembers” the new shape. Cross-linked polyethylene tends to return to the original radius of the bay, making it harder to mount.
- Plastic is cheaper than polyethylene pipelines (with equal product quality).
- Copper is an expensive material, it is connected by soldering to the joint heating by a burner. High-quality performance of work requires considerable experience.
- Corrugated stainless steel is mounted without problems, but has a high hydraulic resistance.
For the successful selection and assembly of the manifold block, we suggest studying a separate manual on this topic. What is the catch: the price of the comb depends on the temperature control method and the mixing valve used - a three-way or two-way. The cheapest option is RTL thermal heads that work without mix or a separate pump.After reviewing the publication, you will definitely make the right choice of underfloor heating control unit.

We prepare the base
The purpose of the preliminary work is to level the surface of the base, lay the pillow and make a rough screed. Preparation of the soil base is as follows:
- Level the ground along the entire floor plane and measure the height from the bottom of the pit to the top of the threshold. A sand layer of 10 cm, a concrete foot of 4-5 cm, thermal insulation of 80 ... 200 mm (depending on the climate) and a full screed of 8 ... 10 cm, a minimum of 60 mm, should fit in the recess. So, the smallest pit depth will be 10 + 4 + 8 + 6 = 28 cm, the optimal - 32 cm.
- Dig a pit to the required depth and tamp the ground. Put the height marks on the walls and pour 100 mm of sand, you can mix with gravel. Seal the pillow.
- Prepare M100 concrete by mixing 4.5 parts of sand with one part of M400 cement and adding 7 parts of crushed stone.
- After installing the beacons, fill the rough base 4-5 cm and allow the concrete to harden for 4-7 days depending on the ambient temperature.
Tip. If the height of the thresholds is not enough, sacrifice a draft floor of 40 mm and reduce the thickness of the screed to 6 cm. In an extreme case, pour 6-7 cm of sand instead of ten, compact the pillow with a vibrating plate. The thermal insulation layer cannot be reduced.
Installation of heating circuits - step by step instructions
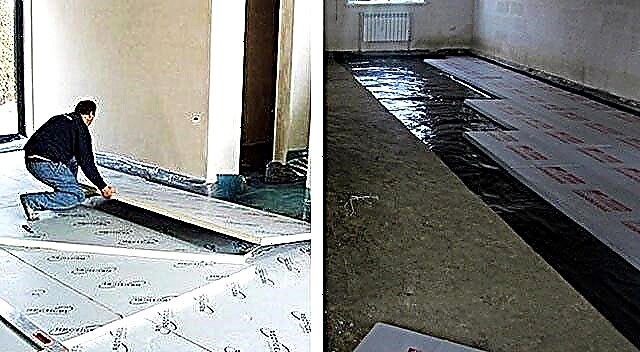
First of all, the base is covered with a waterproofing film with an inlet of 15 ... 25 cm on the walls (thermal insulation thickness + screed). The overlap of adjacent paintings is at least 10 cm, the joints are glued with tape. Then the insulation is tightly packed, the seams are filled with polyurethane foam.
Next, we consider the points on how to make the floor heating itself:
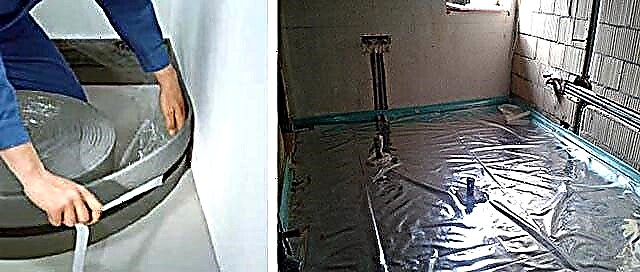
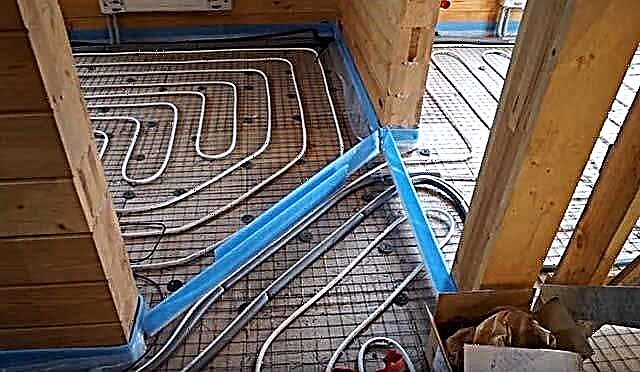
- Paste the walls with a damper strip to the height of the monolith. Discharge the waterproofing over the compensation tape.
- Mount the control cabinet with the pump and manifold inside.
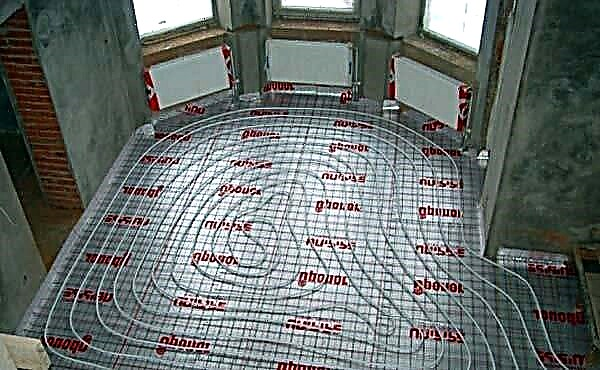
- Lay out the pipes of the circuits according to the diagram, using a measuring tool and observing the installation interval. Loop the ends of the loops immediately and connect to the comb.
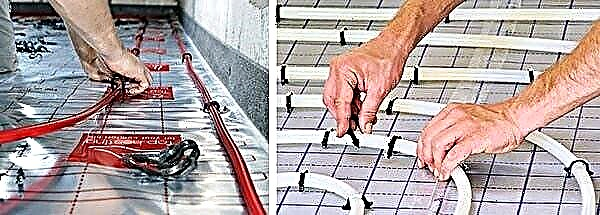
- Attach the pipe to the insulation by inserting plastic “harpoons” in increments of 50 cm. If the structure of the insulation does not hold the clamps well, lay the wire mesh before tying the pipelines and tie it with clamps.
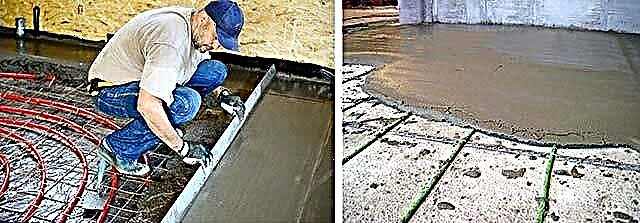
- Install the expansion tape on the expansion joints, as shown in the photo. The latter are arranged along the boundaries of concrete monoliths, between individual heating circuits and in doorways.
- Lay the lines to the radiators, wrapping the pipes with insulating sleeves. The eyeliners to the comb should also be insulated - in this place the loops are too close, there is no reason to heat the floors in the corridor.
- Connect the collector to the heating network of a private house, conduct electricity to the cabinet for the circulation pump and other automation (if available).


Tip. During heating, the monoliths will expand and move relative to each other. Therefore, pipes crossing the boundaries of the plates should be packed in special protective covers or put on insulation sleeves.
After assembling the system, it is necessary to fill the contours of the heated floors with water and check the tightness of the joints by pumping a pressure of 2–4 Bar (refer to the threshold for the boiler safety valve). The technology for filling and discharging air from each TP loop is described in detail in the next article.
It also does not hurt to start the boiler, warm the warm floors without screed and visually verify the correct operation of the system. How to install underfloor heating, shown in the video:
Screed filling and manifold adjustment
For the device of heating monoliths of warm floors, a cement-sand mortar of grade 200 is made with the mandatory addition of a plasticizing composition. Proportions of components: cement M400 / sand - 1: 3, the amount of liquid plasticizer is indicated in the instructions on the package.
Recommendation.So that the pipelines retain their working form and do not float in the solution due to unsuccessful fastening, the system does not empty after pressure testing - the loops remain filled with coolant.
The order of work:
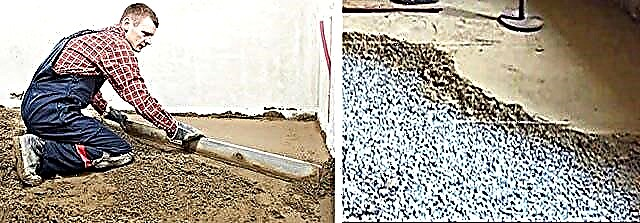
- Get beacons - metal perforated slats, prepare 2-3 buckets of thick mortar without plasticizer. Making restrictive planks of wood is not recommended.
- Using a trowel and a building level, set the beacons at the desired height, as shown in the photo.
- Mix a portion of the main solution, pour in the far corner on top of the “cake” and stretch along the beacons as a rule. If pits are formed with puddles, add the solution, and reduce the volume of the mixing water during the next batch.
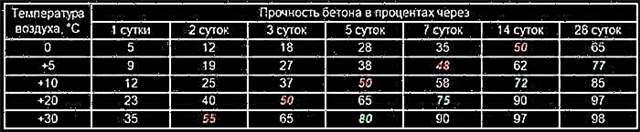
- Repeat the batches until you fill the entire area of the room. Walking on the monolith and carrying out further work is allowed with a set of 50% strength, and start heating - at 75%. The table below shows the set hardness of concrete as a function of time and air temperature.


After hardening to 75% of strength, you can start the boiler and begin to slowly warm the warm floors at a minimum temperature. Open flowmeters or valves on the manifold 100%. Full heating of the screed will take 8-12 hours in the summer, in the fall - up to a day.
It is most convenient to balance loops according to calculation. If you know the required amount of heat to the room, determine the flow rate in the circuit and set this value on the rotameter. The calculation formula is simple:

- G is the amount of coolant flowing through the loop, l / h;
- Δt is the temperature difference between the return and feed, take 10 ° C;
- Q - thermal power circuit, watts.
Note. The scale of the flow meters is marked in liters per minute, so before setting, the resulting figure must be divided by 60 minutes.
The final adjustment is made upon the fact that the finish coating is ready - epoxy bulk floor, laminate, tile and so on. If you do not want to get involved in the calculations, balancing the contours of the warm floor will have to be done using the “scientific poke” method. Ways of adjusting the collector, including using the Valtec program, are described in the latest video:
Conclusion
The installation of water heated floors in a small one-story house is a completely solvable task. It is better to carry out work at the beginning of the warm period in order to have a margin of time to eliminate possible errors. If you want to facilitate the work and speed up the installation, buy special mats with bosses for TP, allowing you to quickly fasten pipes without additional fixing with brackets and clamps. A wire mesh is also not needed.